 Save Pin
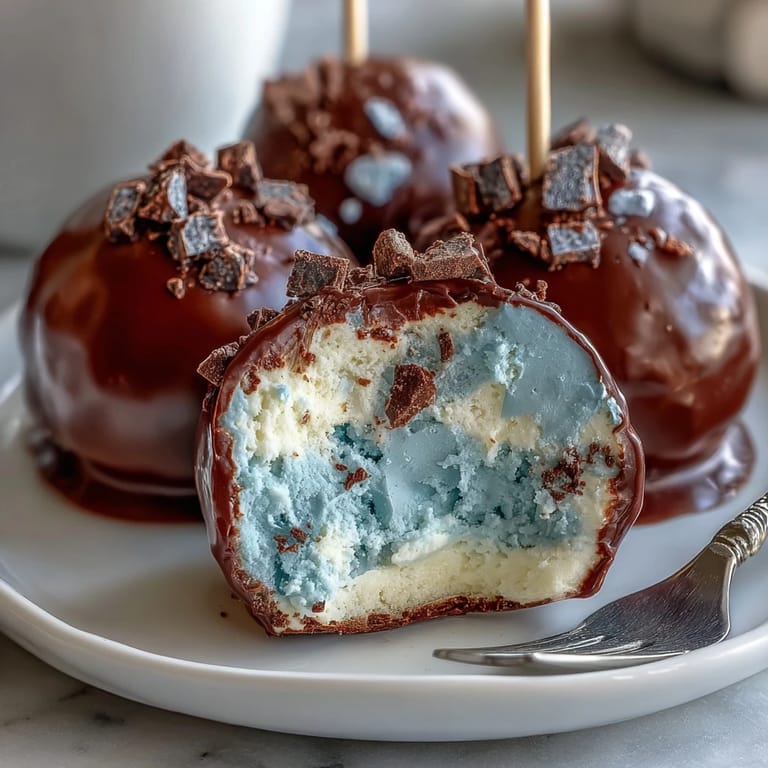
 My sister called me three days before Easter, voice tight with panic, asking if I could bring something to her garden party. I found myself at the kitchen counter at midnight, watching cake crumbs tumble from my fingers into a bowl, thinking about how my mom used to make these tiny confections for us as kids. These robin's egg blue cake pops became my answer that night, and watching guests pop them one after another while sitting on blankets in the grass reminded me why I love making something small that brings that much joy.
I made a batch for my neighbor last summer when her daughter turned five, and I'll never forget how carefully that little girl held hers, like it was too pretty to eat. She eventually did eat it, chocolate speckling her chin, and asked if I could teach her mom how to make the blue ones. There's something about watching someone's face light up when they realize homemade dessert can be both beautiful and delicious that never gets old.
Ingredients
- 1 box vanilla cake mix: The shortcut that nobody judges you for, especially when the result tastes homemade anyway.
- 1/2 cup unsalted butter, softened: Cold butter will fight you during creaming, so pull it out of the fridge at least 30 minutes before you start.
- 1 1/2 cups powdered sugar: Sift this if your sugar has lumps, or you'll spend extra time beating the frosting.
- 2 tbsp milk: Use whole milk for the richest frosting, or whatever you have in the fridge will work fine.
- 1 tsp vanilla extract: This tiny amount changes everything about how the frosting tastes against that blue coating.
- 12 oz white candy melts or white chocolate: Candy melts melt smoother, but real white chocolate tastes better if you're willing to work with it a little longer.
- Blue gel food coloring: Oil-based is crucial here, water-based will make your chocolate grainy and sad.
- 2 tbsp coconut oil or vegetable shortening: This is your backup plan if the coating gets too thick, so keep it nearby.
- 1 tbsp cocoa powder: The secret to that speckled egg look that makes people ask where you bought them.
- 1-2 tsp vodka or clear extract: This thins the cocoa paste just right for flicking specks, and the alcohol burns off instantly.
- 24 lollipop sticks: Buy extra because you'll drop a few in the frosting mixture and feel ridiculous.
Tired of Takeout? 🥡
Get 10 meals you can make faster than delivery arrives. Seriously.
One email. No spam. Unsubscribe anytime.
Instructions
- Bake and cool the cake:
- Follow your box or recipe instructions, and here's the thing nobody tells you: let that cake sit out until it's completely cool, or your frosting will melt when you mix it in. Patience now saves frustration later.
- Make the frosting:
- Cream that soft butter until it's pale and fluffy, about two minutes of steady beating. Gradually add sugar so it doesn't kick up a cloud of white dust into your face, then milk and vanilla until it's smooth as silk.
- Crumble and combine:
- Break the cake into fine crumbs with your hands, then add frosting bit by bit, mixing with your fingers until it holds together like wet sand. You'll know when it's right because it'll feel almost like playdough.
- Roll the balls:
- Roll each portion into a sphere about the size of a walnut, and try to make them roughly the same size so they set evenly. Freeze them for 15 minutes on parchment paper so they don't stick to the pan.
- Prepare your coating station:
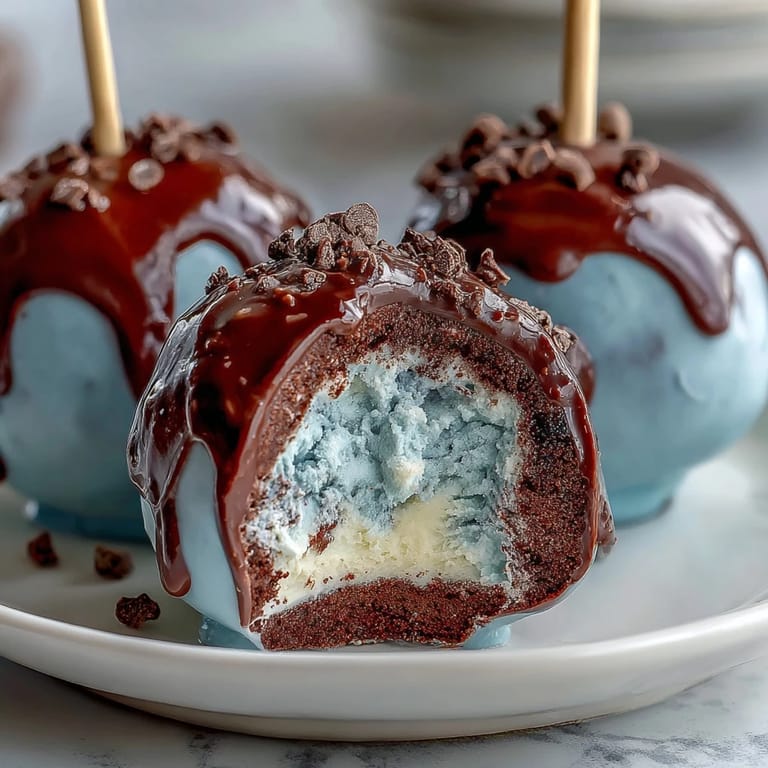
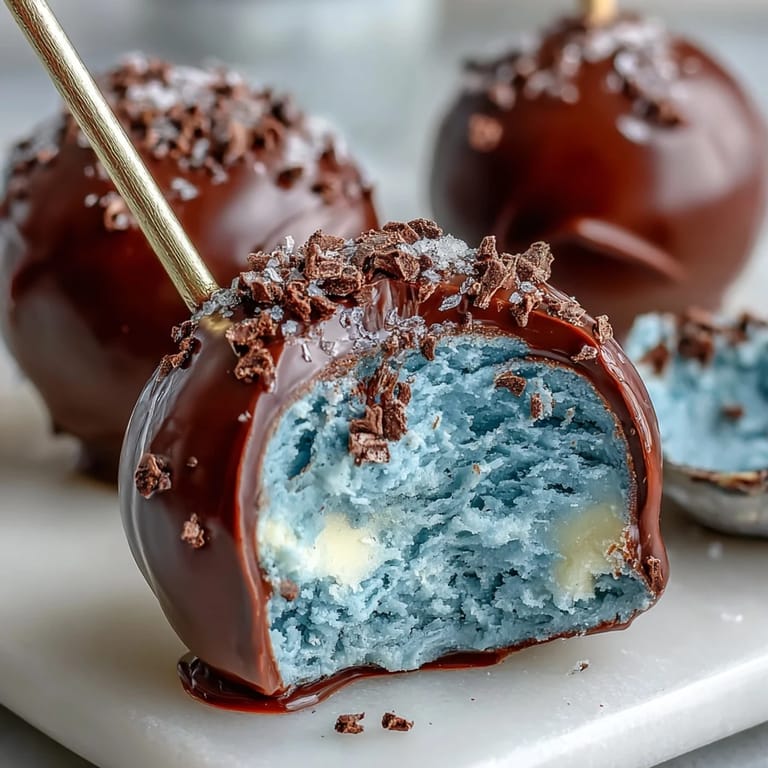
- Melt the white coating gently over a double boiler or in 20-second microwave pulses, stirring between each burst. Once smooth, add blue gel coloring drop by drop until you get that perfect robin's egg shade, like you're holding spring in a bowl.
- Insert the sticks:
- Dip each stick tip in coating and push it halfway into a frozen cake ball, then refrigerate all of them for 10 minutes so they hold firm. This step matters because a stick falling out mid-dip is genuinely annoying.
- Dip into blue:
- Dunk each pop fully into the coating, rotate it slowly, and lift it out while letting the excess drip back into the bowl. Set it upright in a Styrofoam block and try not to move it around too much while it sets.
- Add the speckles:
- Mix cocoa powder with vodka or extract until it's the consistency of thin paint, dip a clean brush in it, and flick your wrist gently over each pop to create those perfect egg-like specks. Practice your flick technique on a paper towel first if you're nervous.
- Final set:
- Let them sit undisturbed until the coating is completely hard, which takes about 30 minutes at room temperature or longer if your kitchen is warm.
 Save Pin
 There's a moment while making these when you step back and see all 24 pops lined up in their Styrofoam stand, blue and speckled like you somehow grew them in your kitchen, that makes the whole endeavor feel worthwhile. That's when someone always walks in and asks if you made those, and you get to say yes with a smile.
The Color Question
Getting that perfect robin's egg blue took me three tries, and I learned that the color deepens as it sets, so add your food coloring slowly and trust your instincts. Too little and you get pale sky blue, too much and you're in peacock territory. I also discovered that lighting matters, so hold your test coating up to natural light before committing to it.
Storage and Make-Ahead Strategy
These cake pops are actually more forgiving than you'd think, and I've found they stay fresh for three days at room temperature in an airtight container, or up to a week in the fridge. The frosting filling holds everything together, and the chocolate coating protects the inside from drying out. If you want to make them a day ahead, that's genuinely the smart move because you'll be less rushed the day of your gathering.
Flavor Variations and Upgrades
Once you nail the basic blue, the frosting becomes your playground for creativity, and I've tested adding almond or lemon extract in place of vanilla with genuinely delicious results. The cocoa speckling is traditional, but I've also tried dusting them with edible glitter or adding gold luster dust mixed into the coating itself for a fancier look. Some days I keep them simple, other days I get adventurous, and both versions disappear just as fast.
- Almond extract in the frosting pairs beautifully with the blue coating and tastes like spring tastes.
- For a gluten-free version, just swap the cake mix and verify every other ingredient label, and nobody will know the difference.
- Make extra balls and freeze them unbaked for up to two months, then dip them straight from frozen if you're in a pinch.
 Save Pin
 These little blue pops have become my go-to for spring celebrations, and they're proof that homemade dessert doesn't have to be complicated to be memorable. Make them once and you'll understand why they keep showing up on tables year after year.
Cooking Questions & Answers
- → What gives the cake pops their robins egg blue color?
The vibrant blue hue comes from blue gel food coloring carefully mixed into melted white candy melts or white chocolate.
- → How are the speckles on the coating created?
A thin paste made from cocoa powder and vodka or clear extract is flicked gently over the coated pops to create festive speckles.
- → Can these pops be made gluten-free?
Yes, by using a certified gluten-free cake mix and ensuring all ingredients comply with gluten-free standards.
- → What is the best way to set the cake pops after coating?
Standing the dipped pops upright in a Styrofoam block or cake pop stand allows the coating to set evenly without damage.
- → How long can these treats be stored?
They can be kept at room temperature for up to 3 days or refrigerated for up to a week to maintain freshness.
- → What optional ingredients enhance the flavor?
Adding lemon or almond extract to the frosting offers a subtle flavor twist that complements the overall taste.